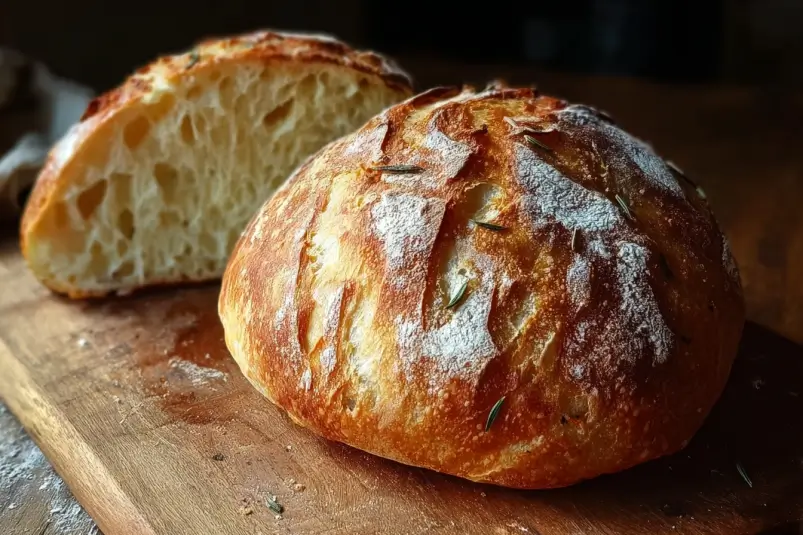
Few aromas compare to the irresistible scent of fresh bread wafting through your kitchen. Crusty Italian Bread captures that essence perfectly—golden, crisp on the outside, and tender, airy within. It’s rustic yet elegant, simple yet deeply satisfying. Each bite delivers a balance of chewy interior and crackling crust that’s ideal for dipping in olive oil, layering with cured meats, or simply enjoying warm with butter.
Unlike complicated artisan loaves that require days of preparation, this Italian bread strikes the ideal balance between authentic texture and home-baker convenience. With a few basic ingredients and patience during proofing, you’ll achieve bakery-quality results right in your oven. Let’s break down the process step-by-step so you can master this timeless favorite.
Ingredients (Makes 1 Large Loaf or 2 Small Loaves)
For the Dough:
- 4 cups (500 g) bread flour (or all-purpose flour with extra kneading)
- 1 ½ cups (360 ml) warm water (about 110°F / 43°C)
- 2 tsp (7 g) active dry yeast
- 2 tsp (10 g) sugar
- 2 tsp (10 g) salt
- 1 tbsp (15 ml) olive oil (plus extra for greasing)
Optional Glaze:
- 1 egg white, lightly beaten with 1 tbsp water (for a glossy crust)
- Or, mist the loaf with water before baking for a rustic matte finish
Equipment Needed:
- Mixing bowl
- Dough hook or hands for kneading
- Kitchen towel or plastic wrap
- Baking stone or heavy baking sheet
- Sharp knife or bread lame for scoring

Instructions: Step-by-Step Guide
Step 1: Activate the Yeast
Pour warm water into a large mixing bowl. Stir in sugar and yeast, then let it sit for 5–10 minutes, until the mixture becomes foamy. This step confirms that your yeast is alive and ready to work. If there’s no foam, discard and start again with fresh yeast.
Step 2: Combine Dry Ingredients
In another bowl, whisk together flour and salt. The salt helps control yeast activity and adds flavor to the final loaf. Gradually add the dry mixture to the yeast mixture, stirring with a wooden spoon or mixer on low speed.
Step 3: Form the Dough
Once the dough begins to come together, drizzle in olive oil and continue mixing. Knead for 8–10 minutes by hand or 6–8 minutes using a stand mixer with a dough hook. The dough should feel smooth, elastic, and slightly tacky but not sticky. If it’s too wet, sprinkle in a tablespoon of flour at a time until it holds shape.
Step 4: First Rise (Bulk Fermentation)
Lightly oil a large bowl and place the dough inside, turning it once to coat all sides with oil. Cover with plastic wrap or a damp towel. Let it rise in a warm, draft-free area for 1 to 1½ hours, until it doubles in size.
Tip: If your kitchen is cool, place the bowl in a slightly warm oven (turned off) with the light on to create a cozy environment for proofing.
Step 5: Shape the Loaf
Once doubled, punch down the dough to release air bubbles. Transfer it to a floured surface. Shape into a round boule (for rustic presentation) or a long batard (for a traditional Italian loaf). Gently stretch and tuck the dough into your desired form, ensuring surface tension across the top.
Place the shaped dough on parchment paper or a floured baking sheet.
Step 6: Second Rise
Cover the shaped loaf loosely with a towel and let it rise again for 30–45 minutes, until puffy but not collapsed. During this time, preheat your oven to 450°F (230°C). Place a baking stone or heavy sheet on the middle rack and a small pan on the bottom rack for steam.
Step 7: Score and Steam
Before baking, use a sharp knife or bread lame to make three diagonal slashes across the top of the loaf. This allows steam to escape and gives your bread that signature artisan look.
If you’re using an egg white glaze, brush it over the surface now.
Just before putting the loaf in the oven, pour a cup of hot water into the empty pan on the bottom rack. The steam creates that crisp, blistered crust Italian bread is known for.
Step 8: Bake to Perfection
Slide the loaf (with parchment) onto the preheated stone or baking sheet. Bake for 25–30 minutes, until the crust turns deep golden brown and the loaf sounds hollow when tapped underneath. Internal temperature should reach 200°F (93°C).
For extra crispness, turn off the oven and let the loaf rest inside for 5 minutes with the door slightly open.
Step 9: Cool Before Slicing
Transfer the bread to a wire rack and let it cool completely for at least 30 minutes. Cutting too early releases steam and makes the crumb gummy, so patience pays off here.
Conservation and Storage
- Room Temperature: Wrap cooled bread in a paper bag or linen cloth. Keeps well for 2 days with a crisp crust.
- Refrigeration: Not recommended; it dries out the crumb.
- Freezing: Wrap tightly in plastic wrap and foil, then freeze for up to 3 months. Reheat directly from frozen at 350°F (175°C) for 10–12 minutes.
- Reviving the Crust: To restore crispness, mist the loaf lightly with water and bake at 400°F (200°C) for 5 minutes before serving.
Variations
1. Garlic Herb Italian Bread
Add 1 tsp dried rosemary, 1 tsp oregano, and 2 cloves minced garlic during mixing for a fragrant, savory loaf.
2. Olive and Parmesan Bread
Fold in ½ cup chopped olives and ¼ cup grated Parmesan after the first rise for a Mediterranean twist.
3. Whole Wheat Italian Bread
Replace 1 cup (125 g) of bread flour with whole wheat flour. The result is denser and nuttier while still crisp on the outside.
4. Sourdough-Style Italian Bread
Substitute ½ cup (120 g) of the water and ½ cup (65 g) of the flour with active sourdough starter. Reduce yeast to 1 tsp for slower fermentation and deeper flavor.
5. Stuffed Italian Loaf
Before shaping, spread the dough with mozzarella, prosciutto, and sun-dried tomatoes. Roll, seal, and bake for a decadent stuffed bread experience.
Serving Suggestions
- Classic Pairing: Slice and serve with extra virgin olive oil, balsamic vinegar, and a pinch of sea salt.
- Soup Companion: Perfect alongside hearty soups like minestrone or creamy tomato bisque.
- Sandwich Base: Use for bruschetta, paninis, or Italian subs. The crust holds fillings beautifully without going soggy.
- Breakfast Option: Toast with butter and honey or spread with ricotta and fruit preserves for a rustic morning treat.
- Dinner Showstopper: Serve whole at the table with a pat of butter or dipping sauce—your guests will tear into it with delight.
Tips for Perfecting Crusty Italian Bread
- Use Bread Flour: The higher protein content gives stronger gluten development, ensuring chewiness.
- Measure Accurately: Use a kitchen scale for consistent results.
- Knead Enough: Under-kneaded dough won’t trap enough air, while over-kneading makes it tough. Aim for smooth elasticity.
- Mind the Water Temperature: Too hot kills yeast; too cool slows fermentation. Keep it around 110°F (43°C).
- Steam Is Key: The initial burst of steam in the oven gives the crust its signature crunch.
- Cool Completely: Cutting too early sacrifices texture. Let steam escape naturally.
Conclusion: A Loaf That Speaks of Simplicity and Soul
Crusty Italian Bread embodies the beauty of simplicity — just a handful of ingredients, yet infinite comfort. From the crisp exterior to the airy, flavorful crumb, this loaf transforms everyday meals into something special. It complements any dish, from hearty pastas to delicate salads, while standing proudly on its own.
Baking this bread connects you to a tradition that spans generations of Italian kitchens — where warmth, patience, and good ingredients come together in one perfect loaf. Once you master it, you’ll find yourself baking it again and again, not just for the taste, but for the pure joy of creating something so timeless and satisfying.
Print
Crusty Italian Bread: The Golden Loaf That Brings the Bakery Home
- Total Time: 2 hours 15 minutes
- Yield: 1 large loaf (10–12 slices) 1x
- Diet: Vegetarian
Description
This Crusty Italian Bread brings the warmth of an authentic Italian bakery to your home. It has a golden, crisp crust and a soft, airy interior—perfect for dipping in olive oil, layering with meats, or enjoying plain and warm. With just a few ingredients and simple techniques, you can create an artisan-style loaf that’s both rustic and elegant.
Ingredients
For the Dough:
4 cups (500 g) bread flour (or all-purpose flour)
1 ½ cups (360 ml) warm water (110°F / 43°C)
2 tsp (7 g) active dry yeast
2 tsp (10 g) sugar
2 tsp (10 g) salt
1 tbsp (15 ml) olive oil (plus extra for greasing)
Optional Glaze:
1 egg white, beaten with 1 tbsp water (for glossy crust)
Or mist with water for a rustic matte finish
Equipment Needed:
Mixing bowl, dough hook or hands for kneading, baking stone or sheet, towel/plastic wrap, and a bread lame or sharp knife.
Instructions
Step 1: Activate Yeast
Mix warm water, sugar, and yeast in a bowl. Let sit 5–10 minutes until foamy.
Step 2: Combine Dry Ingredients
In another bowl, mix flour and salt. Gradually add to yeast mixture. Stir with a spoon or mixer on low speed until dough forms.
Step 3: Knead the Dough
Add olive oil and knead for 8–10 minutes (by hand) or 6–8 minutes (mixer). The dough should be smooth and elastic, not sticky.
Step 4: First Rise
Oil a bowl, place dough inside, and cover. Let rise 1–1½ hours until doubled in size.
Step 5: Shape the Loaf
Punch down dough, shape into a round boule or long loaf. Place on floured parchment.
Step 6: Second Rise
Cover and let rise 30–45 minutes until puffy. Meanwhile, preheat oven to 450°F (230°C) and place a pan for steam on the bottom rack.
Step 7: Score and Steam
Score top with a sharp knife. Brush with egg wash or mist with water. Pour 1 cup hot water into the steam pan right before baking.
Step 8: Bake
Bake 25–30 minutes until golden brown. Tap the bottom—if it sounds hollow, it’s done. Internal temp: 200°F (93°C).
Step 9: Cool Before Slicing
Cool completely on a rack (at least 30 minutes) before slicing.
Notes
Yeast Check: If yeast doesn’t foam, replace it—it’s inactive.
Don’t rush proofing: Allowing full rise improves flavor and texture.
For extra crunch: Leave the loaf in the oven for 5 minutes after baking with the door slightly open.
Storage: Wrap in paper, not plastic, to maintain crust crispness.
- Prep Time: 15 minutes
- Cook Time: 30 minutes
- Category: Bread
- Method: Baked
- Cuisine: Italian
Nutrition
- Serving Size: 1 slice (approx. 80 g)
- Calories: 190 kcal
- Sugar: 1 g
- Sodium: 220 mg
- Fat: 2.5 g
- Saturated Fat: 0.5 g
- Unsaturated Fat: 2 g
- Trans Fat: 0 g
- Carbohydrates: 36 g
- Fiber: 2 g
- Protein: 6 g
- Cholesterol: 0 mg
Keywords: Crusty Italian Bread, Artisan Bread, Homemade Bread, Italian Loaf, Rustic Bread


